This guide shows how to use Claude Code for AI video editing. The workflow is simple: prepare a local project folder, let Claude check and install the required tools, teach it the editing style you like, then ask it to edit your newest video using that style. It is designed for creators who want to automate repeatable edits, captions, and Reels from footage they have already recorded.
This is a video editing with Claude Code workflow, not a text-to-video generator. Claude coordinates the process while local tools do the media work: FFmpeg handles cutting and audio, whisper-ctranslate2 creates the transcript, and HyperFrames builds and renders the visual composition. The article follows the three prompts and sequence in the supplied PDF, with the Claude interface step corrected using your screenshots.
AI Video Editor with Raw Footage, References, Exports, and optionally Music.What this AI video editing workflow does
Claude Code is the coordinator, not a standalone video timeline editor in this particular setup. It reads project files, plans the edit, and runs the tools you approve. FFmpeg processes the media, whisper-ctranslate2 transcribes speech, and HyperFrames builds animated captions and renders the MP4. This makes the workflow useful for talking-head videos, tutorials, and short-form Reels made from existing footage.
If you are searching for an AI video editor, note the intent difference: this tutorial edits footage you already have. It does not generate a new video from a text prompt.
Before you start
This workflow uses Claude Desktop with Claude Code and a local project folder. Anthropic’s current getting-started guide says to open the Code tab, start a session, and choose the project folder. You do not need to upload every source file manually when Claude Code is working in that local folder.
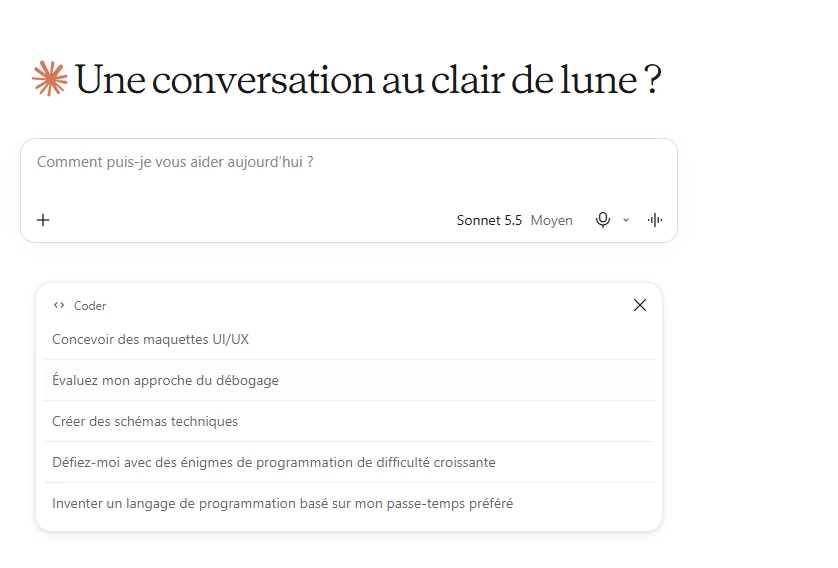
Anthropic’s current availability table lists Claude Code for Pro, Max, Ultra, Team, and Enterprise. The Free plan includes Claude chat, but not Claude Code. Also, the Coder chip below the message box opens prompt suggestions; it is not the Code workspace. See the screenshots in Step 1.
Use the desktop app and make sure you can work from a local folder.
Create one project folder so Claude can keep everything organized.
Prompt 01 asks Claude to install missing tools only after it asks for permission.
You will later feed Claude 3 to 5 example videos to learn your preferred editing taste.
Step 1 — Open Claude Code (not the Coder suggestions)
Open Claude Desktop and use the Code icon/tab in the top bar. In the interface shown in your screenshot, the small Coder chip below the message box opens a list of prompt ideas (UI/UX mockups, debugging, technical diagrams, and similar starters). That menu is not the Claude Code workspace.
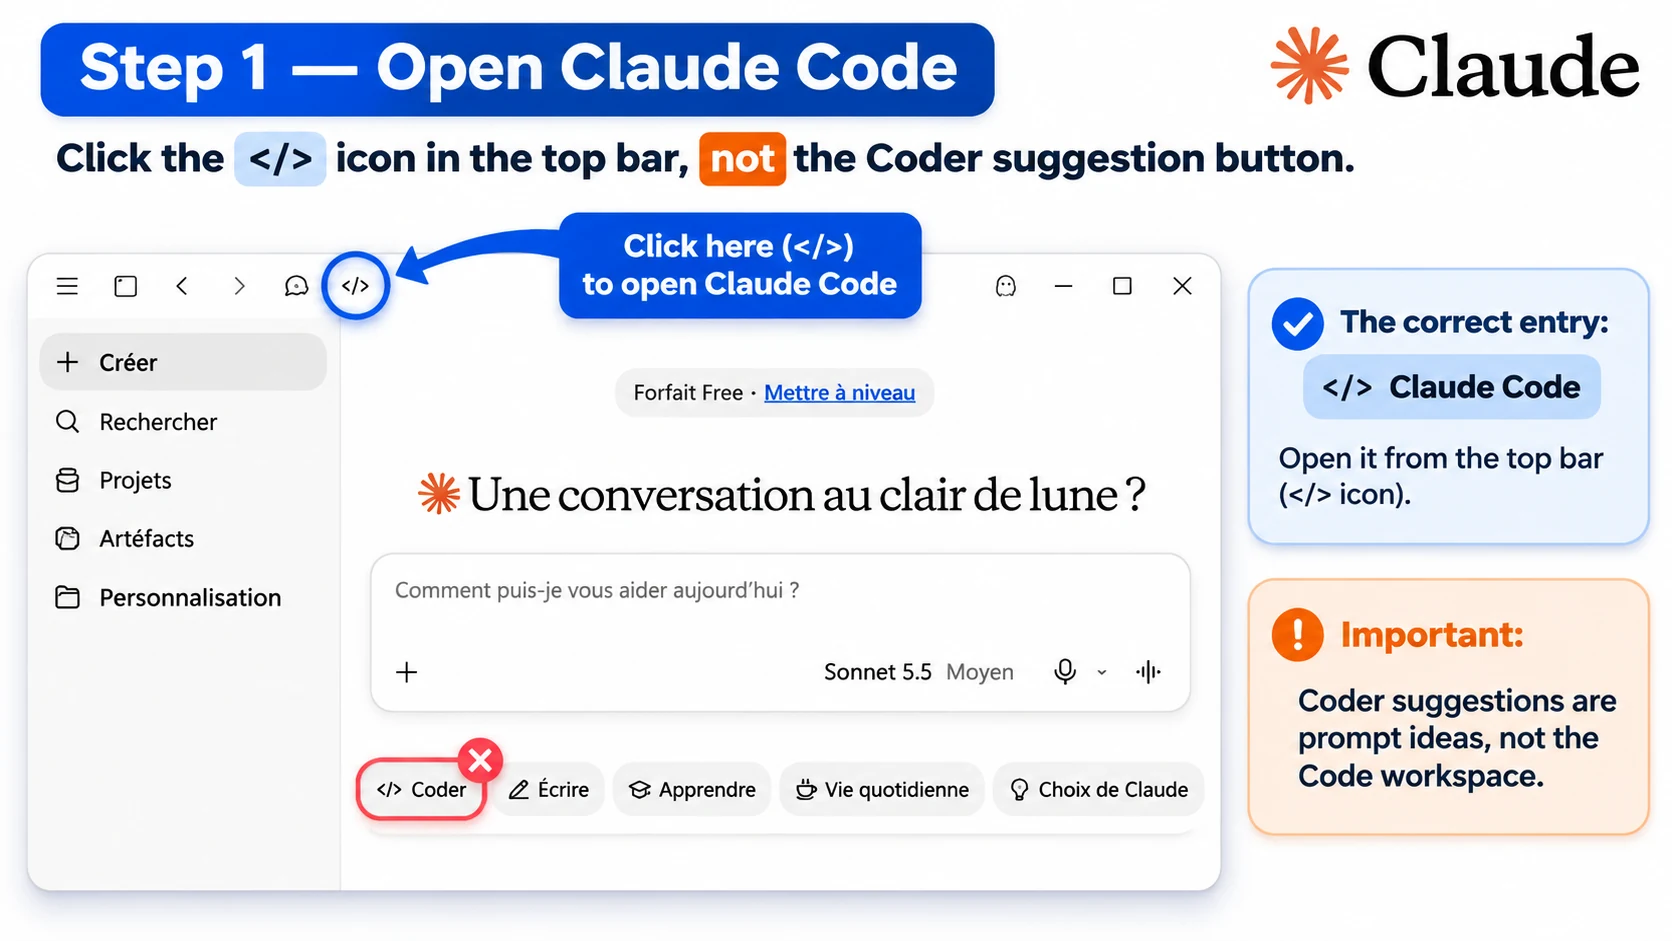
Your screenshot shows the Free plan. Anthropic's current availability table lists Claude Code for Pro, Max, Ultra, Team, and Enterprise plans; the Free plan includes chat but not Claude Code. If the Code workspace is unavailable after clicking the top-bar icon, you need a plan that includes Claude Code.
Check Anthropic's current Claude Desktop availability table.
What to do
- Open Claude Desktop.
- Click the top-bar Code icon/tab (not the Coder suggestion chip below the composer).
- Start a new Code session.
- Choose the local folder option and select
AI Video Editor. - Keep this session dedicated to the video-editing project.
Why this matters
Claude Code needs access to your local project folder so it can read the footage, create STYLE.md, run local tools, and save exports. Anthropic's getting-started guide describes opening the Code tab and choosing the project folder.
Step 2 — Create the project folder
Create a folder named AI Video Editor. Inside it, create the subfolders shown in the PDF: Raw Footage, References, and Exports. We also recommend adding a Music folder because Prompt 03 expects music to come from your own files.
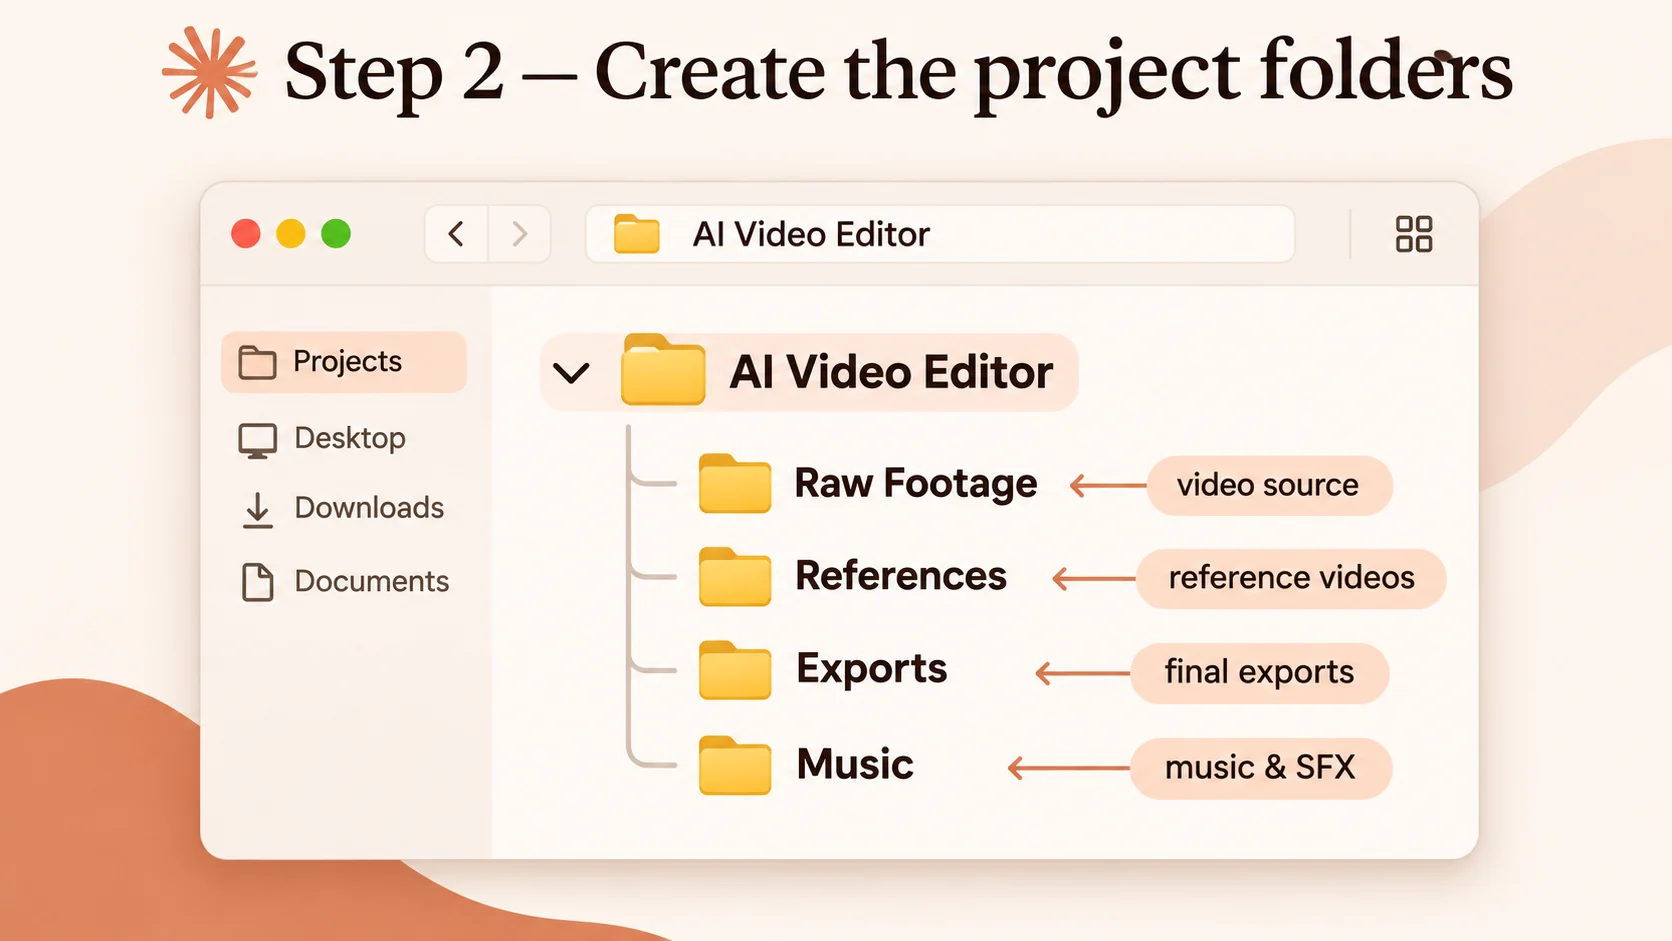
AI Video Editor/├── Raw Footage/├── References/├── Exports/└── Music/
After creating the folder, connect Claude to it using the local-folder workflow. From this point forward, the three prompts will operate inside that same project space.
Step 3 — Prompt 01: Install the AI video editing tools
Prompt 01 is the setup prompt. It tells Claude to inspect your machine, install what is missing, and test the tools before moving on. The tools listed in the prompt include Node.js, FFmpeg, uv, HyperFrames, whisper-ctranslate2, and yt-dlp.
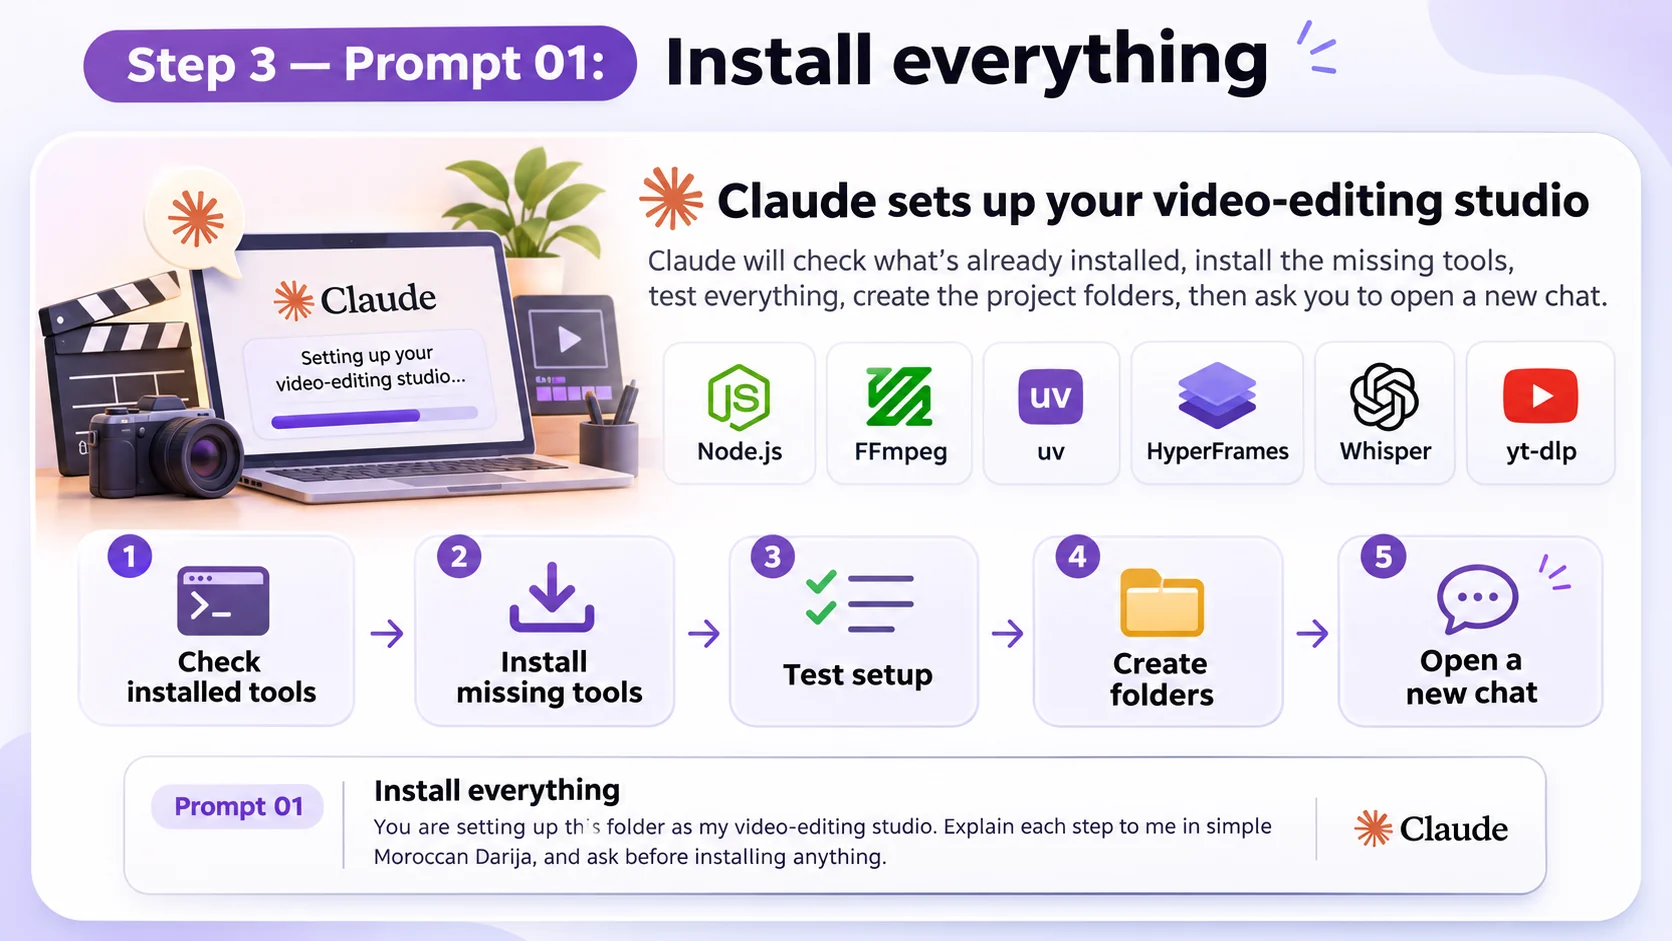
You are setting up this folder as my video-editing studio. Explain each step to me in simple Moroccan Darija, and ask before installing anything.

1. Check my OS and what is already installed (node, ffmpeg, uv, hyperframes, whisper-ctranslate2, yt-dlp). Skip what is already there.
2. Install what is missing:
  - Windows (PowerShell):
     winget install OpenJS.NodeJS.LTS
     winget install Gyan.FFmpeg
     powershell -ExecutionPolicy ByPass -c "irm https://astral.sh/uv/install.ps1 | iex"
  - macOS: brew install node ffmpeg uv (if there is no Homebrew, use the official installers from nodejs.org, ffmpeg and astral.sh/uv)
  Then, on any OS:
     npm install -g hyperframes
     hyperframes browser ensure
     uv tool install whisper-ctranslate2 --python 3.12
     uv tool install yt-dlp
     npx -y skills@latest add heygen-com/hyperframes --all -g -a claude-code -y
     npx -y skills@latest add remotion-dev/skills --all -g -a claude-code -y
  Remotion is not installed globally: it is created inside a project only when a video needs it. Just check that npm can reach it with: npm view remotion version
  If a command is not found right after installing, open a new terminal (PATH) and try again.
3. Test that everything really works:
  - node -v, ffmpeg -version, yt-dlp --version, whisper-ctranslate2 --help
  - make a 3-second test video with HyperFrames (npx hyperframes init _test --example blank --resolution portrait --non-interactive --skip-transcribe, then render it to Exports/test.mp4) and check that the file plays.
4. Create the folders Raw Footage, References and Exports if they are missing.
5. Finish with a short table: tool | version | test OK or not. If something failed, fix it before you stop.
6. Tell me to close this chat and open a new one, so the new skills load.
What Claude should do here
- Check what is already installed.
- Install only the missing tools.
- Test the tools with version checks.
- Create a 3-second test video with HyperFrames.
- Create missing folders if needed.
- Finish with a short results table.
What you should do
Read what Claude says, approve installations when needed, and wait until every tool is tested successfully. When it finishes, close the chat and open a new one so the new skills load properly.
The prompt below is reproduced from the supplied PDF. HyperFrames' current official guide also documents the standalone skill command npx skills add heygen-com/hyperframes. For Claude Code, it also documents a versioned plugin route. If the older command in Prompt 01 is not recognized, follow the current official installation guide rather than repeatedly retrying an outdated command.
HyperFrames official repository and installation instructions.
The guide explicitly says to close the chat and open a new one after setup. That refresh helps Claude load the newly added skills before you continue with the style-learning and editing steps.
Step 4 — Prompt 02: Teach Claude your editing style
Prompt 02 teaches Claude the editing style you like. You give it 3 to 5 example video links. Claude then studies the hook, pacing, caption placement, highlighted words, music energy, and motion between cuts. Finally, it writes a file named STYLE.md that defines the rules for your future edits.
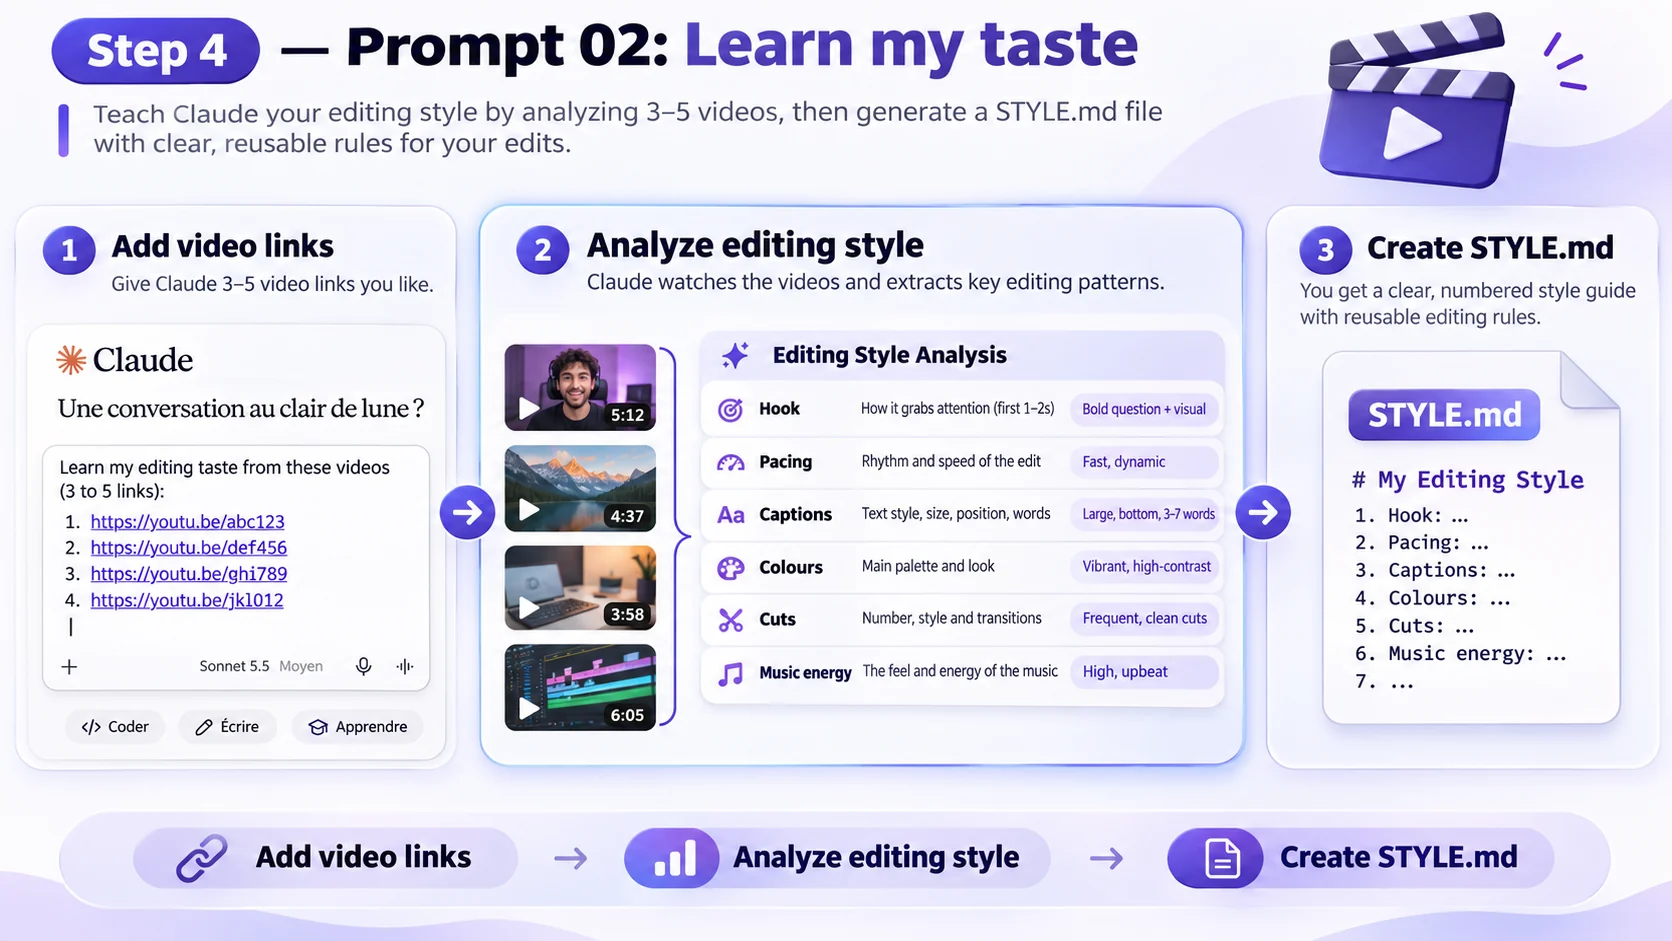
Learn my editing taste from these videos (3 to 5 links):
1. <link>
2. <link>
3. <link>
4. <link>
5. <link>

1. Download them with yt-dlp into References/. If a link fails, tell me and I will put the file there myself.
2. For each video, measure it with ffmpeg: duration, number of cuts and average shot length (scene detection), and the loudness. Make a contact sheet of its shots and look at it yourself. Transcribe the first 10 seconds with whisper-ctranslate2 to see the hook and the caption rhythm.
3. Note for each one: the hook in the first 2 seconds, the pacing, the caption style (font, size, position, how many words at a time, highlighted words), the colours, the motion between shots, the music energy.
4. Write STYLE.md in this folder: clear, numbered rules my edits must follow (with numbers: shot length, caption size and position, colours as hex codes…), plus what makes these videos work.
5. The key rule: take inspiration from them, not a copy. Never reuse their words, footage, music, logos or characters. My face, my voice and my brand stay mine.
6. Show me STYLE.md in 10 lines of Darija and ask me what to change.
- 1Replace the placeholders with your own video links.
Do not send the prompt with<link>still unchanged. - 2Let Claude analyze the videos.
It measures technical rhythm and also studies the visual style. - 3Review
STYLE.md.
Claude should summarize it in Darija. Read it and ask for changes until it matches your taste.
Prompt 02 clearly says to take inspiration, not to copy. Claude should not reuse someone else’s words, footage, music, logos, or characters. The result should still be your own face, voice, and brand.
Step 5 — Prompt 03: Edit your video
Now place your real source video inside Raw Footage. If you have background music or sound effects that you are allowed to use, place them in Music. Then send Prompt 03. Claude will transcribe the speech, let you correct the transcript, remove dead air, add captions in the style of STYLE.md, preview four still frames, and finally render the draft and the final export.
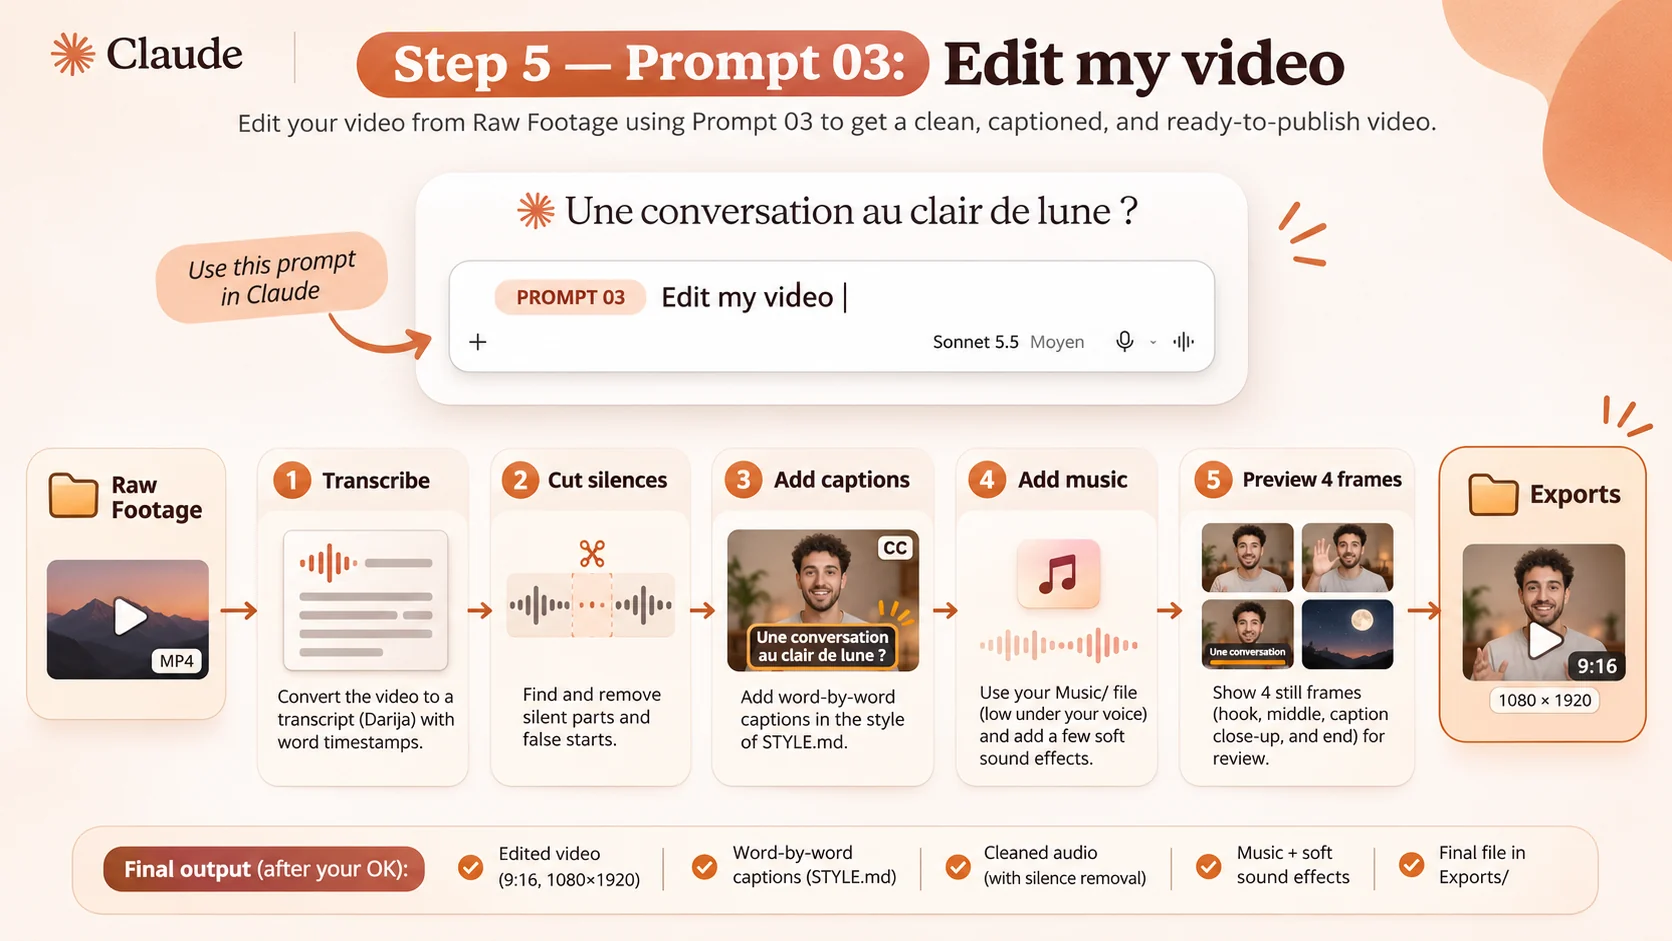
Edit the newest video in Raw Footage/ following STYLE.md. Talk to me in Darija.

1. Transcribe it with whisper-ctranslate2 with word timestamps (my language: Moroccan Darija, use --language ar). Show me the transcript and let me correct the words before you make captions: the captions use my corrected text, not the raw transcription.
2. Cut the dead air: find the silences with ffmpeg (silencedetect) and remove the pauses and false starts, keep all my real sentences.
3. Build the edit as a HyperFrames composition (use the hyperframes skill): 9:16, 1080x1920, word-by-word captions in the style of STYLE.md with the key words highlighted, light motion graphics where they help understand.
4. Music: use the file I put in a Music/ folder, low under my voice. If there is none, ask me (never download music from the internet). Add a few soft sound effects on the visual moments.
5. Before rendering, show me 4 still frames (hook, middle, a caption close-up, end) and a short list of what you cut. Wait for my OK.
6. Render a draft, then the final into Exports/. Check a few frames of the final yourself before telling me it is done.
7. If I ask for a change in plain words ("kbbr l hook", "captions l fou9", "music ghir chwiya"), apply it, show me again, and re-render only what changed.
What happens in this step
- Claude transcribes your Darija speech with word timestamps.
- You correct the transcript before captions are generated.
- Claude removes silences and false starts while keeping your real sentences.
- It builds a 9:16 edit with word-by-word captions and light motion graphics.
- It previews 4 frames and waits for your approval.
- It renders a draft and then a final file in
Exports/.
What you should check
Review the corrected transcript, the caption style, the hook frame, the music level, and whether the final export feels clean and easy to watch.
Full workflow summary
- 1Set up the environment.
Open Claude Desktop and work from the correct local-folder style workflow. - 2Create the folder structure.
BuildAI Video Editorwith the required subfolders. - 3Paste Prompt 01.
Install and test the tools, then start a fresh chat. - 4Paste Prompt 02.
Give Claude 3 to 5 example links so it can generateSTYLE.md. - 5Add your video and optional music.
UseRaw FootageandMusic. - 6Paste Prompt 03.
Review the transcript, approve the preview frames, and let Claude render the final export.
Frequently asked questions
Can I use Claude Code on the Free plan?
No. Anthropic's current availability table lists Claude Code for Pro, Max, Ultra, Team, and Enterprise. Claude Desktop chat is available on Free, but the Code feature is not. Check the official availability table before subscribing.
Does Claude edit an MP4 by itself?
In this workflow, Claude Code coordinates local tools rather than acting as a standalone timeline editor. FFmpeg processes the video and audio, whisper-ctranslate2 creates the transcript, and HyperFrames builds and renders the composition.
Where should I put my source video?
Put the source video in Raw Footage. Put licensed background music and sound effects in Music. The workflow saves drafts and final exports in Exports.
Why does the Coder button show suggestions?
The Coder chip below the composer opens prompt suggestions. It is not the Claude Code workspace. Use the Code icon or Code tab in Claude Desktop, then select your local project folder.
Can Whisper transcribe Moroccan Darija perfectly?
No transcription system is perfect, especially with dialects, names, and mixed Arabic-English speech. Review and correct the transcript before the captions are rendered; Prompt 03 includes this approval step.
Official documentation and tools
Use these official pages to confirm the current installation steps and tool requirements. Commands and supported versions can change, so check the latest documentation before installing.
- Download Claude Desktop and open the Code workspace.
- Anthropic: Your first day in Claude Code.
- HyperFrames official repository for skills, preview, and rendering.
- FFmpeg official documentation.
- whisper-ctranslate2 documentation.
- yt-dlp official repository.